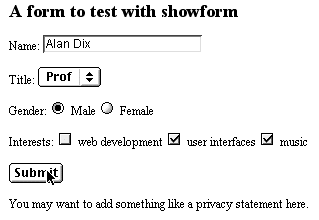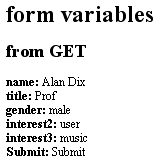

Showform allows you to test simple web forms. It simply creates a web page listing all the variables that have been submitted by a web form enabling you to see what is sent to the web server.
It is intended largely for tutorial use although can be used for testing functional forms too. However it does have limitations, in particular it does not fully test file uploads.
You set up a questionnaire or form on your web site, then link to a special script on meandeviation. When you fill in the form and submit it, the form contents are listed on a web page for you to examine.
Because the script runs on the meandeviation server you can use this script even if your own web provider does not allow you to run scripts. All you need is somewhere to put a normal web page.
If you want to collect results from your form or questionnaire and cannot install scripts on your web server, you can use the meandeviation mailform script to have results mailed back to you.
If you want to make write your own scripts on a web server try the PHP tutorial on this site.
The simplest way to use see how showform works is to try out the sample at testshowform.html.
Fill out the form, press submit and look at the resulting page.

![]()

If you already know how to use web forms simply create the form as normal and then set the 'action' attribute of the <form> tag to "http://www.meandeviation.com/webform/showform.php". It is usually best to set the 'method' to 'POST', but of you want to see the variables in the URL you can use 'GET'.
If you are new to web forms you can copy the test file and try editing that.
When the user hits the submit button the web browser (IE, Netscape, Opera etc.,) constructs a request to the web server which has all the form fields in it. If the 'method' in the <form> tag is 'GET' these are visible in the URL and you can see it in the URL space at the top of the browser window.
 |
|
|
The fields are coded in the form name=value (e.g. "title=Prof" etc.). Notice that spaces are coded as '+' or '%20' and other special characters are coded as %nn (try putting a '&' in one of the fields). The name=value pairs are separated from each other with '&' and are separated by an '?' from the URL for the script itself ("showform.php"). Play it out and see.
If you use the 'POST' method in your web page <form> tag then the browser passes the field values in a similar way, but they are not visible on the URL. Browsers and web proxies also tend to treat 'GET' and 'POST' differently. If the form uses 'GET' method the results are likely to be cached (that is if exactly the same URL appears twice including all the fields then the previously seen page may be used). If you use 'POST' then there will be no caching. This means that 'GET' is best to use for accessing data (e.g. search results on a slowly changing data set) whereas 'POST' should be used where the form is actually doing something (e.g. updating a database).
The web server sees this URL and passes it to the script. Usually the web scripting language separates the variables out and decodes the spaces etc., to make it easy for your script.
In the case of PHP (used in "showform.php") the variables are put into an array called $_GET or $_POST (depending on the <form> tag method). So, in the case of using the 'get' method, the script can use variables like $_GET['name'], $_GET['title'], $_GET['interest2'] and also put the variables. However the details of the way this is done does vary between web scripting languages.
The showform.php script simply lists these variables on a web page, but you would normally use the variables to do something like access or update database.
Look in the source of the testshowform.html page (use View > Source or the equivalent on your browser). You can first of all play with this as it is, but copy it and save it on your own web server (or view locally) and try changing it, adding fields etc.
Look in the file you will see a standard web form (enclosed in <form> </form> tags).
<form method="GET" action="http://www.meandeviation.com/webform/showform.php">
    ...
    ...
</form>
|
The 'action' attribute of the <form> tag is set to "http://www.meandeviation.com/webform/showform.php". The 'method' for this form is 'GET'.
It is possible to have several forms on a single page, but each are treated entirely separately. This can be confusing to a user who may enter data into several of the forms, but only one set of data gets sent to the web server.
Inside the <form></form> tags are a number of fields for the user to complete.
The first is a simple text field for a name.
|
|
Notice that normal HTML is used to format the label for the field "<p>Name:". There are several types of the <input> tag and the 'type' attribute tells you which kind it is. In this case the type is "text". In order to give the names to the fields as they are passed to the web server each <input> tag has a 'name' attribute. Just to confuse you (!) the 'name' attribute of this field is also "name" (well it is a person's name!).
The second form field is a <select> tag which creates a pull down menu
|
|
Each <option> tag gives one of the menu options. The <option selected> tag says which is the default menu item. The field name is given in the <select> tag (in the example "title").
The next item is a set of radio buttons:
|
|
Notice that each of the radio buttons has the same 'name' attribute (in this case 'gender'). Radio buttons with the same name are treated as a group and only one is allowed to be selected at once (in this case you can't select both Male and Female). You can have several such groups on a web page distinguished by different names.
One of the radio buttons in the group has a 'checked' attribute. This means that it is the default selected when the form is first displayed. The user can of course change this.
Note also that, unlike the pulldown menu items that must all occur together within the <select></select> tags, the radio buttons are each completely separate tags. This means that, in principle, the radio buttons connected with a single group can be anywhere in the form, but from a usability view it is normally confusing if they are not close and clearly connected.
The last collection of input items are some check boxes:
| |||
| |
|||
The difference between these and radio buttons is that any number, or none at all, may be checked. They are therefore displayed differently in the browser and have different names. Again you can say whether checkboxes are checked by default, but because the checkboxes are independent any number may be initially checked.
Notice that the values of the checkboxes ("web", "user", "music") do not have to correspond exactly (or at all) to those given to the user ("web development", etc.). For example, the form could show French names to the user but use English names in the scripting code.
If you look back at the URL generated from the example form you will notice that it includes "interest2=user&interest3=music" but no value for interest1. Only the values associated with checked boxes are sent to the server. This means that the script typically has to have code that says "is the field 'interest1' set - if so ...". You can imagine that this may become difficult for very large numbers of items.
Depending on the web scripting language used there are 'tricks' for dealing with large numbers of checkboxes. For example, in Java Servlets you can give all the checkboxes the same name and then retrieve the values one by one, in PHP if you set the name to be something like 'interest[]' it will create a PHP array of all the values that have been checked.
The last item in the form (although does not have to be at the end) is the submit button:
|
|
When this is pressed this tells the browser to actually send the form data. Until this point the only interaction is between the user and the web browser - all the values entered are purely on the user's own machine.
You can name the button anything you like, but unfortunately the name of the button is what appears on it, unlike the checkbox where the names used and the appearance are separated. Unfortunately, web forms have evolved and do not have a clean user interface model!
It is possible to have several 'submit' buttons in a single form - the form data gets sent when the first of them is pressed. If you have a long form, particularly if later parts are optional it is often good to put submit buttons at the top and bottom of the form (so long as it is clear to the user that they shouldn't press the top one too soon!)
| http://www.meandeviation.com/webform/about-showform.html | Alan Dix © 2002 |